
The first step with using KTAK’s is the set up. They are simple to set up and the directions to do so are short and sweet, so read them and understand them before anything else…
More Reality
If paper and one hit steel is all you have trained with before, you are going to have to think outside the box to get the most out of the KTAK target. Both, as a student and an instructor.
You need a sound understanding of the basics (gun handling) and a basic understanding of human physiology….
Why? The KTAK system makes you think… In the middle of a string you will have to use your head because the target is not going to do what you expect.
Realistic training is the norm rather than the exception when firing at KTAK targets.
Multiple hits, multiple strike zones and multiple reactions are very similar to what one might encounter in the real world.
Less Pretend
No pretending, if the target does not fall, it has to be hit repeatedly until it does. You get immediate feedback as to whether or not rounds were effective.
It opens up possibilities that were just not available before.
Analysis of a trainee is instant, no need to go back over the paper and count hits or assume the hits on paper were even effective. The target falls or it doesn’t….
The target excels in scenario situations and combat courses. (What many of you may know as jungle trails or Hogan’s alley) They are also very effective in shoot houses. Knock it down or the shooter does not advance…
Since it was designed to be hard to knockdown it also works great with drug/body armor drills. Especially when you engage the hip shot lock.
Numerous Set Up Options
Even before you take the first shot there are different ways to set up the target. And one thing I always do is cover the target with a shirt and a face…. It was designed to be used this way and not doing so will effect the set up.
1 The standard set up is a multiple shot knockdown, number of hits required to the upper thoracic (chest) plate is easily set by the user. Single hit to the head plate is still an option…
2 Single upper thoracic shot knockdown with a simple no tool manipulation of the linkage.
3 Center mass drop, first round drops the target vertically but doesn’t knock it over, you still have to knock it down after it drops
4 Hip shot lock, target will not fall until you hit either one of the hip plates. Target will then drop vertically yet still has to be knocked down.
One of the great features is that set ups 2, 3 and 4 can all be set by an instructor without the shooter knowing…
Using multiple targets, all set up differently, can really challenge a student. How the targets are used by an instructor and how they are engaged by the student offers virtually endless possibilities
Student Options
The student always has options on how they engage one of my targets. Because the target may not react as expected the student will have to pay attention to what is happening with the target.
How someone reacts when the target does not do what they expect is a great learning experience for new and experienced shooters.
Always the option of going for a head shot but it is a low percentage shot due to the extremely small strike plate….
Reality, Paper and Steel
I am definitely a fan of training that is more realistic than a simple firing line at the range. Paper targets definitely have there place and this target was not designed to replace paper. Rather, it is a significant step beyond simple one hit knockdown steel.
My target is set at a realistic height, while most knockdown steel is very close to the ground. Bad guys do crouch on the ground but they also tend to stand….
Improving the Conditioned Response
This is a big topic these days as more and more Law Enforcement, Civilian and Military Trainers begin to realize that many of the common practices are turning out to be not such good ideas after all. Two to the body and one to the head may work on paper but what if you miss? A KTAK target used in the place of paper will not allow you to stop shooting until the target is down. You don’t get to move on unless the target is neutralized. You now become “conditioned” to pay attention to what is happening to your target, not a specific round count or predetermined course of fire.
Forced Accuracy
I find this to be an important element to the target. So much talk is about shot placement these days, how about a target that reinforces that ideal. If you don’t hit what you are supposed to hit the target will not fall….
Forced Failure
No, the target is not designed for you to fail. What it does is help a student learn to overcome failure, ie what happens when the target doesn’t go down. How a student reacts to a failure to stop is an important element to their training that was hard to simulate until now.
And I would much rather a student learn this on the range and not in the real world….
 Cardboard and Clothing
First and most importantly is that the target was never intended to be fired at while uncovered. Not knowing where the strike plates are is one of the benefits to this system. You need a basic knowledge of human physiology…
And secondly is what might best be described as the reality factor. Shirts and faces add a touch of realism that cannot be achieved with flat steel plates or even with detailed paper anatomy targets.
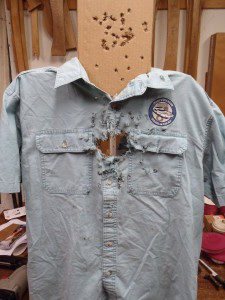
Shirts
There are 3 really good reason for using shirts at the range. First off, the target looks much more realistic to something you may encounter off the range. In the real world bad guys do not have clearly defined strike zones or bullseye’s painted on them. Shooting at shirts alters how you see a target.
Secondly it conceals the hits so the shooter cannot correct their aim based on looking for holes after a shot. Which is actually a very bad habit .
And third, it eliminates having a distinct point of aim. This last one just might be the most important aspect of shooting at shirts. It’s a great way to learn to “call” your shots. Knowing where you are hitting is way better than guessing and hoping…. Bad guys don’t wear bullseye’s.
It also teaches you where to shoot to be the most effective.
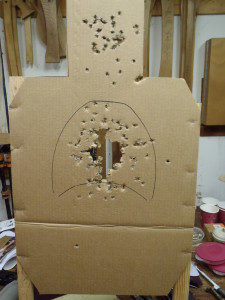
So, why Cardboard?
Cardboard stiffens up the shirt and also provides a surface that indicates the hits so you can show a student why the target is not falling. No arguing when the evidence is right in front of you.
The cardboard supports the shirt but also acts as a tattle tale for the shooter. Lifting the shirt will reveal just exactly where you are hitting. I have found that most people, including LEO’s, shoot low when first shooting at a target covered with a shirt.
Another option is to mark the location of the strike plates on the cardboard. This is a great learning tool as well since you just lift up the shirt to expose the hits.
Faces
Carboard also provides a surface to attach a face target. And why faces? Bad guys have eyes and if you are not familiar with shooting a target that has eyes you may pause when you shouldn’t…
Next to No Sound
Another thing you will find with how I build targets is that they do not make the typical “tink” sound (common to simple steel targets) when you hit them. For the most part there is virtually no audible feedback.
Bad guys don’t go “tink” when you hit them and neither do KTAK Targets.
Accuracy and Shot Placement
To say you have to be accurate is a bit of an understatement…. The target not only requires you to be accurate, the strike plates are not very large, but it also forces you to do so repeatedly. If you aren’t, the target/threat is left standing.
Shot placement is a hot topic right now (and always should have been…) With the requirement for accuracy, shot placement becomes paramount. If your shots don’t hit what they are supposed to, the target will not fall.
This is why it has come up on occasion that this is not a target for a novice. Not that you need a lot of experience but a new shooter will burn through a ton of ammo trying to hit the small strike plates.
Which brings up….
Ammunition Management
When shooting an array of these targets you can easily run out of ammo before you have taken down all the targets. And this is not just an issue with new shooters but experienced shooters as well.
And it happens naturally during a string of fire, no taking two shots and moving on. You have to make the target fall before moving on.
Transitions
And speaking of running out of ammo, the target also works extremely well when transitioning from a long gun/carbine to a side arm/pistol. All without making any changes to settings of the target.
Run your long gun dry without the target falling and all you have to do is switch to your pistol and the target will still fall, but only with accurate hits…. Much more realistic with my target compared to “pretending” with paper or one hit steel poppers.
OODA Loop
The Target automatically forces you into an OODA loop since quite often it will not react how you expect it to. Keeps you from a run and gun type mentality. Especially when an instructor re-sets the target, since he or she can change the settings on the fly. The shooter may not be able to count on their own predetermined number of rounds to knock it down….
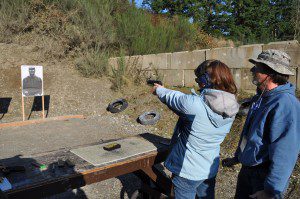 Shooting with a Student
Depending on the range surface an instructor can easily tell if a students rounds are effective. Because the target does not make sound when you hit it, a shooter or the instructor cannot confirm hits by listening for a “tink”, as there isn’t one….
An instructor has to rely on their eyes to see where the hits are. Hits will deflect to the ground right behind the target while misses hit the berm behind it. Surprisingly this is not obvious to the shooter while they are firing.
When it comes down to it, the KTAK target is probably the most realistic target you have ever used. One day it may even save your life….